View and enter class details in the Gradebook
In the
You can also:
- Enter a comment about the class to appear in the Family and Student portals.
- Link a section to other linked sections. Linking sections lets you create categories and assignments for one section, and automatically add them to other sections linked to it.
- Set up your assignment categories (such as Tests, Homework, Projects) for the traditional
- Determine how to drop the lowest scores for a class.
To view class details:
- Log on to the Staff view.
- Click the
- Click the Details side-tab. The details for
that class appear.
Note: On the Options menu, click Change History to view a list of changes made to the section.
- Use the following table for information about the fields:
-
Field
Description
Course Nickname
The default class section number from your school’s schedule appears. You can replace this course and section number with a nickname so this class is easily identifiable throughout your
Example: If you teach two sections of Calculus, and one section is more crowded than the other, you might name the smaller section CalSM and the larger section CalLG. Or, if sections always meet during the same block or period, you might name them after that. Note: If you do not type a nickname, Aspen identifies the class with the default class section number from your school's schedule. Description
The read-only description for this section appears.
Classroom
The read-only classroom for this section appears.
Schedule
The read-only schedule for this section appears.
Schedule term
The read-only schedule term for this section appears.
Team
If this section is assigned to a team, it appears here.
House
If this section is assigned to a house, it appears here.
Average Mode (Your
To apply a different averaging mode than the default you defined in your
Note: If you co-teach this section, you cannot select Gradebook default from the Average mode drop-down. The average mode you select appears for the other teachers who share the class. Averages
The
Click to select a differentThis field appears if enabled in your Portal Notes
Show Notes on Portals
If you want a comment about this class to appear in the Family and Student portals, select the Family Portal Notes Show Notes on Portal? checkbox. Then, enter your comment in the text box below.
Example: Some teachers enter their The comment appears in the Teacher Notes section on the details page for the class in the Family and Student portals.
Note: If you do not select this checkbox, or select it but do not enter any text in the text box, the Teacher Notes section will not appear in the Student and Family portals. Click Classes linked for assignments and categories to view classes linked to this section or to link this section to another section.

To add a linked section, click Select.... In the pick list, select the sections you want to link, and then click OK. The sections appear on the page.
Note: To unlink a course, click Select... and deselect the checkbox next to the course. Click OK. Enter a name for your linked sections
This field only appears after you add a linked class section. Enter a name for this linked section.
To create your assignment categories, see "
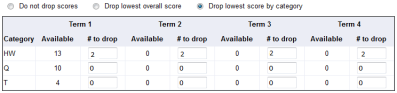
Click Drop Mode if you want to drop the lowest scores for this class:
-
Select Do not drop scores if you do not want the system to drop any scores for this class.
-
Select Drop lowest overall score if you want Aspen to drop the lowest score(s) for a term. The following options appear:

For each term, the number of scores appears in the Available column. Type the number of scores you want to drop for that term in the # to drop column.
-
Select Drop lowest score by category to determine how many scores to drop each term by assignment category.
Example: You might drop the two lowest homework scores for each term. To do so, type the number in the # to drop column for each category, for each term:
Note: On the Scores page, the system indicates dropped scores with
 because they fit the criteria you specify here.
Grade calculation weights
To customize the default
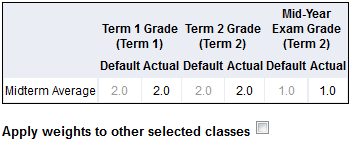
Note: Your Aspen system administrator must Within the table, each post column that is an average appears as a row. The component
The Default sub-columns are read-only and display the default weight set by your administrator for each
Until you customize the weight of a
Note: The Actual weights for each row do not have to add up to 100. The weight of a component Note: If the final date to post Apply weights to other selected classes
If you want to apply the same set of custom
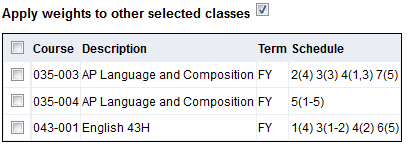
Select the checkboxes next to the classes you want to apply theNote: You can view a list of your classes that have calculation weight override records on the Calculation Overrides page. You can also delete override records on this page, causing those classes to revert to the default -
- Click Save.
| Note: If the final date to post |
| Note: An administrator can merge your class sections if they occur during the same class period. If your course sections are merged, a message appears with a link directing you to the "primary" class section. |